Thursday 15 January 2015

MVVM-iOS Basics


If you’ve been developing iOS applications for any length of time, you’ve probably heard of Model-View-Controller, or MVC. It’s your standard approach to building iOS apps.  Lately, however, I’ve been growing tired of some of MVC’s shortcomings. In this article, I’m going to go over what MVC is, detail its weaknesses, and tell you about a new way to structure your apps: Model-View-ViewModel.

Source code : https://github.com/sibahota059/MVVM-iOS


Model-View-Controller

Model-View-Controller is the definitive paradigm within which to structure your code. Apple even says so. Under MVC, all objects are classified as either a model, a view, or a controller. Models hold data, views present an interactive interface to the user, and view controllers mediate the interaction between the model and the view.

In our diagram, the view notifies the controller of any user interaction. The view controller then updates the model to reflect the change of state. That model then (typically through Key-Value-Observation) notifies any controllers of updates they need to perform on their views. This mediation makes up a lot of the application code written in iOS apps.

Model objects are typically very, very simple. Often times, they’re Core Data managed objects or, if you prefer to eschew Core Data, other popular model layers. According to Apple, models contain data and logic to manipulate that data. In practice, models are often very thin and, for better or worse, model logic gets shuffled into the controller.

Views (typically) are either UIKit components or programmer-defined collections of UIKit components. These are the pieces that go inside your .xib or Storyboard: the visual and interactable components of an app. Buttons. Labels. You get the idea. Views should never have direct references to models and should only have references to controllers through IBAction events. Business logic that doesn’t pertain to the view itself has no business being there.

That leaves us with controllers. Controllers are where the “glue code” of an app goes: the code that mediates all interactions between models and views. Controllers are responsible for managing the view hierarchy of the view they own. They respond to the view loading, appearing, disappearing, and so on. They also tend to get laden down with the model logic that we kept out of our model and the business logic we kept out of our views. That leads us to our first problem with MVC…

Massive View Controller

Because of the extraordinary amount of code that’s placed in view controllers, they tend to become rather bloated. It’s not unheard of in iOS to have view controllers that stretch to thousands and thousands of lines of code. These bulging pieces of your app weigh it down: massive view controllers are difficult to maintain (because of their sheer size), contain dozens of properties that make their state hard to manage, and conform to many protocols which mixes that protocol response code with controller logic.
Massive view controllers are difficult to test, either manually or with unit tests, because they have so many possible states. Breaking your code up into smaller, more bite-sized pieces is typically a very good thing.

Missing Network Logic

The definition of MVC – the one that Apple uses – states that all objects can be classified as either a model, a view, or a controller. All of ‘em. So where do you put network code? Where does the code to communicate with an API live?
You can try to be clever and put it in the model objects, but that can get tricky because network calls should be done asynchronously, so if a network request outlives the model that owns it, well, it gets complicated. You definitely should not put network code in the view, so that leaves… controllers. This is a bad idea, too, since it contributes to our Massive View Controller problem.
So where, then? MVC simply doesn’t have a place for code that doesn’t fit in within its three components.

Poor Testability

Another big problem with MVC is that it discourages developers from writing unit tests. Since view controllers mix view manipulation logic with business logic, separating out those components for the sake of unit testing becomes a herculean task. A task that many ignore in favour of… just not testing anything.

Introducing MVVM

One issue facing iOS developers is how to deal with major iOS updates for existing projects. More specifically, how to implement UI/UX changes as iOS evolves. Because iOS uses a combined view-controller design, this task can require a greater level of effort than should be necessary. Here’s why: because the view and controller are coupled, an iOS view-controller class will usually contain both UI logic and business logic. This means that changes in the way the view is presented (UI logic) will usually also require changes to business logic within the same view controller class.

Further, as view controller classes implement increasingly complex UI requirements, the amount of business-logic code also tends to grow within the same view controller class. This, is turn, typically results in large, unwieldy, and difficult-to-read view controller classes.

Wouldn’t it be better to have thin, flexible, easy-to-read view controller classes in iOS?

You might have seen this joke on Twitter a while back:
“iOS Architecture, where MVC stands for Massive View Controller” via Colin Campbell


The MVVM Design Pattern

The “Model-View ViewModel” design pattern, or “MVVM”, is similar to the MVC as implemented in iOS, but provides better decoupling of the UI and business logic. This decoupling results in thin, flexible, and easy-to-read view controller classes in iOS.  

MVVM also provides better encapsulation. Business logic and workflows are contained almost exclusively in the viewModel (referred to as the view manager in the example project). The view/view controllers concern themselves only with the UI and know little, if anything, about  the business logic and work flow in the viewModel.

MVVM is built around three fundamental parts: data model, view/view-controller, and viewModel:


1) Data Model
Just like in the MVC design pattern, the MVVM data model is a class that declares properties for managing business data. For instance, a banking app would need to manage user account data like account balances, transaction history, etc. These data objects are declared in the model as class properties with appropriate getters and setters.

2) ViewModel
The viewModel is at the heart of the MVVM design pattern and provides the connection between the business logic and the view/view controller. The view (UI) responds to user input by passing input data (defined by the model) to the viewModel. In turn, the viewModel evaluates the input data and responds with an appropriate UI presentation according business logic workflow.
The viewModel then is the hub of activity in the MVVM design, acting as an intelligent traffic control center for the model, business logic, workflow, and view/view-controller.

3) View/View Controller
The view/view controller is the context (i.e. the view controller class) that presents user interface elements. As mentioned above, in iOS the view/view controller is usually coupled to business logic within a view controller class.
Conversely, in MVVM, the view/view controller contains little or no business logic and is primarily responding to the viewModel to configure and present UI elements (e.g. table views, buttons, etc.)

MVVM comes from Microsoft, but don’t hold that against it. MVVM is very similar to MVC. It formalizes the tightly coupled nature of the view and controller and introduces a new component.
Under MVVM, the view and view controller become formally connected; we treat them as one. Views still don’t have references to the model, but neither do controllers. Instead, they reference the view model.

The view model is an excellent place to put validation logic for user input, presentation logic for the view, kick-offs of network requests, and other miscellaneous code. The one thing that does not belong in the view model is any reference to the view itself. The logic in the view model should be just as applicable on iOS as it is on OS X. (In other words, don’t #import UIKit.h in your view models and you’ll be fine.)


Since presentation logic – like mapping a model value to a formatted string – belong in the view model, view controllers themselves become far, far less bloated. The best part is that when you’re starting off using MVVM, you can place only a little bit of logic in your view models, and migrate more of it over to them as you become more comfortable with the paradigm.

iOS apps written using MVVM are highly testable; since the view model contains all the presentation logic and doesn’t reference the view, it can be fully tested programmatically. The numerous hacks involved in testing Core Data models notwithstanding, apps written using MVVM can be fully unit tested.

The results of using MVVM, in my experience, is a slight increase in the total amount of code, but an overall decrease in code complexity. A worthwhile tradeoff.

If you look again at the MVVM diagram, you’ll notice that I’ve used the ambiguous verbs “notify” and “update”, but haven’t specified how to do that. You could use KVO, like with MVC, but that can quickly become unmanageable. In practice, using ReactiveCocoa is a great way to glue all the moving pieces together.

To know more about it with an Example, here you will find the source code.

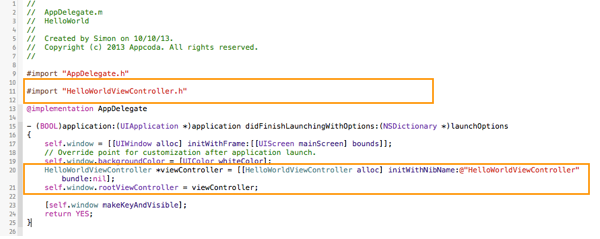
Coding difference between MVC & MVVM
Below screenshot is for OLD MVC pattern.


Below screenshot for MVVM pattern (Compare viewDidload of both)


Below Screenshot for View model Class


Practical Considerations

As we've seen, MVVM as a design pattern in iOS is useful and yields many benefits. However, as with any design, care must be taken to understand the limitations and the appropriate implementation in any given project or project feature. Complex project features with a small number of views may not realize the same benefits of MVVM that a larger feature with many repetitive views would. Each developer must think carefully about the best design pattern for any given project. Hopefully you will find MVVM a useful approach in your latest iOS project.

Happy coding :)


Make Your First iPhone App "Hello World!"

Note : This tutorial only works for Xcode 5 or Higher versions and Objective-c. As Apple released Xcode 6 and Swift,We will have another tutorial later on Swift.


The Hello World tutorial is the first programming article written for this blog and we will move on in future articles with interesting topics 7 tutorials. to make sure you like this post and want me to continue , please feel free to comment , ask Questions and let me know if you are looking for some thing else. I have some open sourced controls such as SPHChatBubble, SPHChatCollectionview etc in my github home page https://github.com/sibahota059 you can visit them later when you are ready with iOS concepts & programming knowledge.

In previous versions of Xcode , the default for mat for creating UI was XIB files but, Xcode 5 promotes the use of Storyboard instead of Interface Builder. When you create a new Xcode project using the Single View template, it defaults to Storyboard. There is no XIB file generated. Let me use Interface Builder to build this tutorial project. It doesn’t mean i prefer Interface Builder over Storyboard, which is great. I just want you to learn both. 

Enter the Hello World tutorial for Xcode 5.

You may have heard of “Hello World” program if you have read any programming book before. It has become the traditional program for first-time learner to create. It’s a very simple program that usually outputs “Hello, World” on the display of a device. In this tutorial, let’s follow the programming tradition and create a “Hello World” app using Xcode. At the end you will be able to cover the following topics.
  • A better idea about the syntax and structure of Objective C.
  • A basic introduction to the Xcode & You’ll learn how to create a Xcode project and create user interface with the built-in interface builder.
  • Compiling , building & testing apps on iOS Simulator.

Lets take a look at the out put how it will come at the ending ( The final deliverable ).

This app is very simple and shows only a “Hello World” button. When tapped, the app prompts you a message. That’s it. Nothing complex but it helps you kick off your iOS programming journey.

HelloWorld App Deliverable

To start a new project , launch Xcode from your launchpad. Once launched, Xcode displays a welcome dialog. From here, choose “Create a new Xcode project”.


Xcode 5 Welcome Dialog
 
Picture for welcome dialogue Xcode-5

Xcode shows you various project template for selection. For your first app, choose “Empty Application” and click “Next”.


Xcode Empty Application Template


This brings you to another screen to fill in all the necessary options for your project. 

Hello World Project Options

You can simply fill in the options as follows:
  • Product Name: HelloWorld – This is the name of your app.
  • Company Identifier: com.domainame – It’s actually the domain name written the other way round. If you have a domain, you can use your own domain name. Otherwise, you may use mine or just fill in “edu.self”.
  • Class Prefix: HelloWorld – Xcode uses the class prefix to name the class automatically. In future, you may choose your own prefix or even leave it blank. But for this tutorial, let’s keep it simple and use “HelloWorld”.
  • Device Family: iPhone – Just use “iPhone” for this project.
  • Use Core Data: [unchecked] – Do not select this option. You do not need Core Data for this simple project.
If you’ve used Xcode 4.6 or lower, you may find the option of “Use Automatic Reference Counting” and “Include Unit Tests” options are left out in Xcode 5. They are not options in Xcode 5 but defaults.
 
Click “Next” to continue. Xcode then asks you where you saves the “Hello World” project. Pick any folder (e.g. Desktop) on your Mac. You may notice there is an option for version control, Just deselect it. As you confirm, Xcode automatically creates the “Hello World” project based on all the options you provided. The screen will look like this:
 
 
 Hello World Empty Xcode Project


A quick look at the Xcode

Let’s take a few minutes to have a quick look at the Xcode workspace environment. On the left pane, it’s the project navigator. You can find all your files under this area. The center part of the workspace is the editor area. You do all the editing stuffs (such as edit project setting, class file, user interface, etc) in this area depending on the type of file selected. Under the editor area, you’ll find the debug area. This area is shown when you run the app. The rightmost pane is the utility area. This area displays the properties of the file and allows you to access Quick Help. If Xcode doesn’t show this area, you can select the rightmost view button in the toolbar to enable it.
Xcode 5 Workspace

Lastly, it’s the toolbar. It provides various functions for you to run your app, switch editor and the view of the workspace.

Xcode 5 Toolbar

Run Your App for the First Time

Even you haven’t written any code, you can run your app to try out the Simulator. This gives an idea how you build and test your app in Xcode. Simply hit the “Run” button in the toolbar. 


Xcode Run Button


A white screen with nothing inside?! That’s normal. As your app is incomplete, the Simulator just shows a blank screen. To terminate the app, simply hit the “Stop” button in the toolbar. 

By default, Xcode sets to use iPhone Retina (3.5-inch) as the simulator. You are free to select other simulators to test the app. Try to select another simulator and run the app.


Xcode Simulator Selection

Back to Code

Okay, let’s move on and start to add the Hello World button to our app. Before we can put a button, we first need to create a view and its corresponding controller. You can think of a view as a container that holds other UI items such as button. Go back to the Project Navigator. Right-click on the HelloWorld folder and select “New File”.


Xcode 5 Add New File

Adding a new file in Project Navigator


Under the Cocoa Touch category, select the Objective-C class template and click Next.

Xcode 5 Create New Class

Name the new class as HelloWorldViewController and the subclass as UIViewController. Make sure you check the “With XIB for user interface” option. By selecting this option, Xcode automatically generates a Interface Builder file for the view controller.

HelloWorldViewController Class with XIB

You’ll be prompted with a file dialog. Simply click the Create button to create the class and XIB. Once done, Xcode generates three new files including HelloWorldViewController.h, HelloWorldViewController.m and HelloWorldViewController.xib. If you select the HelloWorldViewController.xib file, you’ll find a empty view similar to the below image:


HelloWorldViewController XIB
HelloWorld Interface Builder (.xib)
Now we’ll add a Hello World button to the view. In the lower part of the utility area, it shows the Object library. From here, you can choose any of the UI Controls, drag-and-drop it into the view. For the Hello World app, let’s pick the button and drag it into the view. Try to place the button at the center of the view.
Interface Builder Drag Button

Drag button into the View

Next, let’s rename the button. To edit the label of the button, double-click it and name it “Hello World”.

Interface Builder Edit Label

If you now try to run the app, you’ll still end up with a blank screen. The reason is that we haven’t told the app to load the new view. We’ll need to add a few lines of code to load up the  HelloWorldViewController.xib. Select the AppDelegate.m in Project Navigator. Add the following import statement at the very beginning of the file:


#import "HelloWorldViewController.h"
 
In the didFinishLaunchingWithOptions: method, add the following lines of code 

self.window.backgroundColor = [UIColor whiteColor];
 HelloWorldViewController *viewController = [[HelloWorldViewController alloc] initWithNibName:@"HelloWorldViewController" bundle:nil];
 self.window.rootViewController = viewController;


Your code should look like this after editing:


HelloWorld AppDelegate Code


What you have just done is to load the HelloWorldViewController.xib and set it as the root view controller. Now try to run the app again and you should have an app like this:

HelloWorld App with Button

For now, if you tap the button, it does nothing. We’ll need to add the code for displaying the “Hello, World” message.

Coding the Hello World Button

In the Project Navigator, select the “HelloWorldViewController.h”. The editor area now displays the source code of the selected file.  Add the following line of code before the “@end” 


#import <UIKit/UIKit.h>

@interface HelloWorldViewController : UIViewController

-(IBAction)showMessage;

@end


Next, select the “HelloWorldViewController.m” and insert the following code before the “@end” line:


- (IBAction)showMessage
{
    UIAlertView *helloWorldAlert = [[UIAlertView alloc]
                                    initWithTitle:@"My First App" message:@"Hello, World!" delegate:nil cancelButtonTitle:@"OK" otherButtonTitles:nil];
   
    // Display the Hello World Message
    [helloWorldAlert show];
}
 
Source Code of HelloWorldViewController After Editing


Connecting Hello World Button with the Action

Select the “HelloWorldViewController.xib” file to go back to the Interface Builder. Press and hold the Control key on your keyboard, click the “Hello World” button and drag to the “File’s Owner”. Your screen should look like this 


Connect HelloWorld Button

Release both buttons and a pop-up shows the “showMessage” action. Select it to make a connection between the button and “showMessage” action.

ShowMessage Send Events
Send Events Selection


Test Your App

That’s it! You’re now ready to test your first app. Just hit the “Run” button. If everything is correct, your app should run properly in the Simulator.

HelloWorld  App

Congratulation! You’ve built your first iPhone app. It’s a simple app however, I believe you already have a better idea about Xcode and how an app is developed.


What You Need to Begin iOS Programming

Apple iPhones are considered as most advanced smartphones available in the market today. The power of iPhones can be explored using the Apps and Games. As of July 2014, Apple's Store has more than 1.3 million applications optimized for iPhones and other gadgets.  There is huge demand for quality iOS Apps and Games in the market. Adversely, it increased the demand iOS developers capable of developing quality Apps and Games. 

In recent years, India is growing to be the major offshore mobile application centers in World. It has opened huge career prospects for iOS developers. Thus, iOS Training will help professionals to bloom with the raise of mobile application development. Here are some important tips to become an iOS Developer.

Get Necessary Tools:

To create mobile Apps for iOS you need to have Mac computer. Then, you need to get necessary development tools named Xcode. This software is available in the Apple developer Web site or from Mac App Store. By installing this application, you can write and compile iOS Apps on your personal computers. Xcode software has two important tools for developer's iOS simulator and Xcode. The iOS simulator allows you to run and test application on your Mac computers. The second one is the Interface builder. This tool provides programming objects and controls needed to create the iPhone applications.

Learn C and object C Programming Language:

The C programing language is the successor of Objective C. It is main programming language used for iPhone mobile application development. IOS developers are recommended to learn the C programming language. Without the knowing the OOPS concept, it is difficult to developing high quality application for iPhone. You need to be familiar with other concepts like memory management, objective C and Object Orientation in programming methodology. IOS Training from reputed training center covers whole syllabus required for iPhone mobile application development.

Learn iOS environment:

With in-depth knowledge in Objective C programming language, you can lean iOS mobile application development environment easily. Developers use Interface Developer for creating custom interface for iPhone applications. There are several training institutes offering training on iOS mobile application development. You need to choose reputed training academy that offer professional training through experienced trainers.


Register an Apple Developer Account


Don’t mix this up with the paid iOS Developer Program that we’re going to talk about in later section. Everyone can register as an Apple developer for free. By registering the developer account, you’re allowed to download Xcode, access documentation of the iOS SDK and other technical resources such as development videos.
You can go to Apple’s developer website for registration. The registration process is very straightforward. Simply create an Apple ID (if you don’t have) and fill in your personal profile. 


Market your Own Application: (Optional)

When you are ready with your custom application, you need to register with iOS Developer Program. The annual subscription cost is $99. Once registering, you become an official iOS developer & can upload and sell your own apps. You can able to submit your application to the iOS App Store and make sustainable income from the potential iPhone users from all over the world.